- Schema Book
- MMAP Storage Engine
MMAP Storage Engine
The main storage engine in MongoDB is the Memory Mapped Storage Engine or MMAP for short. The MMAP storage engine uses memory mapped files as its storage engine.
Overview
- Uses memory mapped files to store data
- Allocates memory using power of 2 byte sizes (32, 64, 128, 256, … 2MB)
- In place updates are fast
- Db level locking from MongoDB 2.2, Collection level locking from 3.0
- Benefits from preallocation strategy
- Can cause fragmentation
- No compression available (stores documents with all keys)
Memory Mapped Files
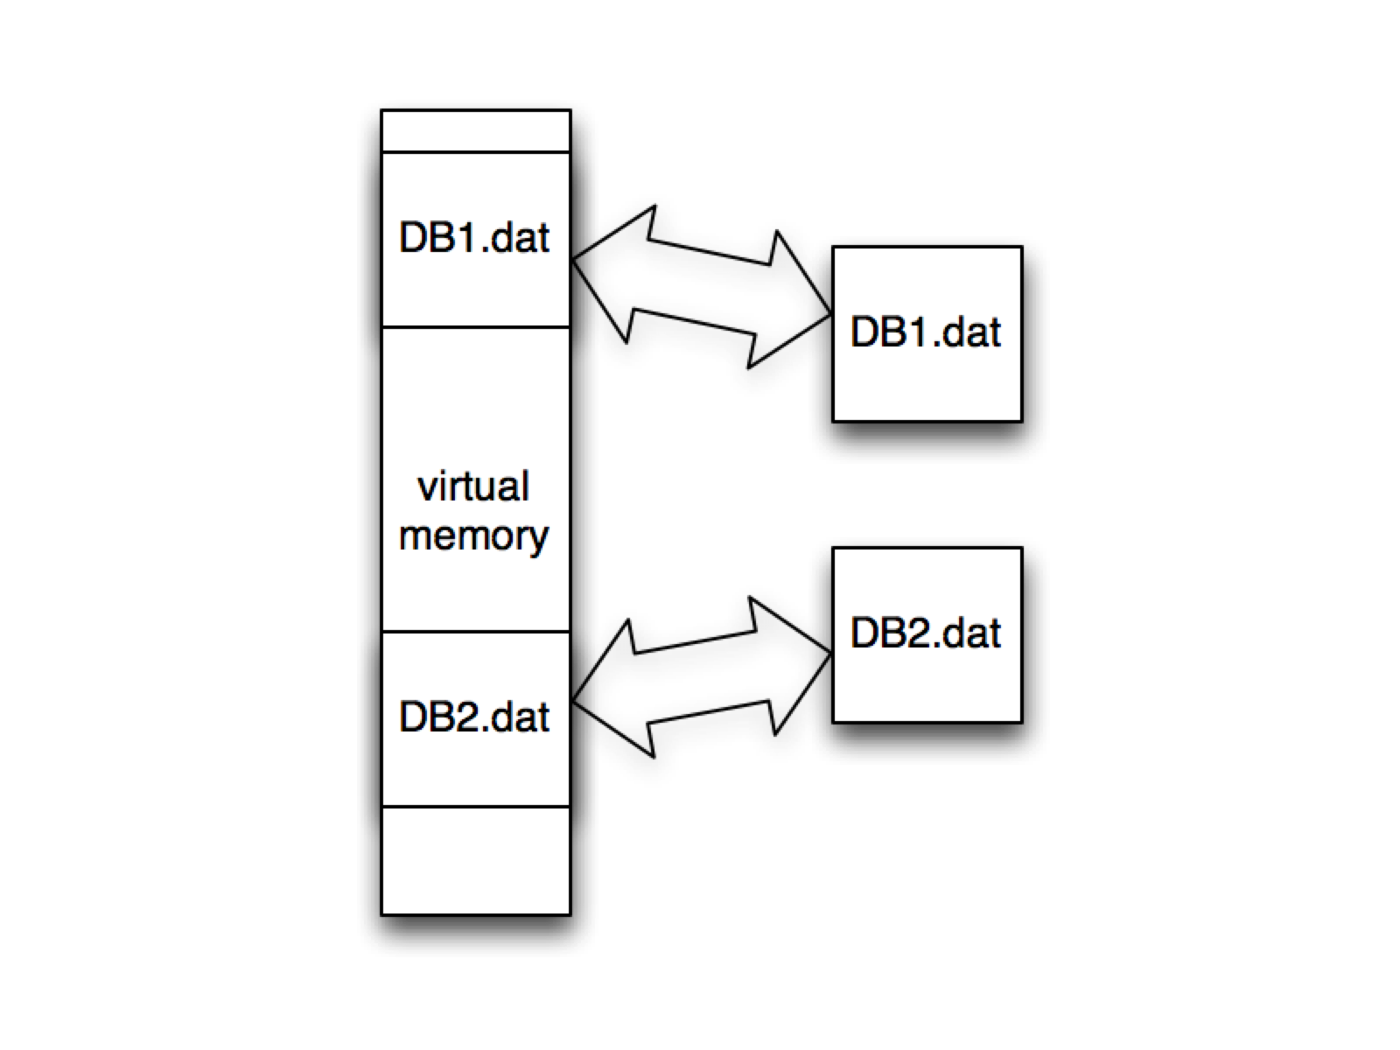
The MMAP Storage engine uses memory mapped files to store its data (A memory-mapped file is a segment of virtual memory which has been assigned a direct byte-for-byte correlation with some portion of a file).

Memory mapped files allow MongoDB to delegate the handling of Virtual Memory to the operating system instead of explicitly managing memory itself. Since the Virtual Address Space is much larger than any physical RAM (Random Access Memory) installed in a computer there is contention about what parts of the Virtual Memory is kept in RAM at any given point in time. When the operating system runs out of RAM and an application requests something that’s not currently in RAM, it will swap out memory to disk to make space for the newly requested data. Most operating systems will do this using a Least Recently Used (LRU) strategy where the oldest data is swapped to disk first.
When reading up on MongoDB, you’ll most likely run into the words “Working Set”. This is the data that your application is constantly requesting. If your “Working Set” all fits in RAM, then all access will be fast because the operating system will not have to swap back and forth from disk as often. However, if your “Working Set” does not fit in RAM, you suffer performance penalties as the operating system needs to swap one part of your “Working Set” to disk, in order to access another part of it.
This is usually a sign that it’s time to consider either increasing the amount of RAM in your machine or to shard your MongoDB system so more of your “Working Set” can be kept in memory (sharding splits your “Working Set” across multiple machines RAM resources).
tip
Determine if the Working Set is too big
You can get an indication of if your working set fits in memory by looking at the number of page faults over time. If it’s rapidly increasing it might mean your Working Set does not fit in memory.
  use mydb
  db.serverStatus().extra_info.page_faults
Allocation
From MongoDB 2.6 the default allocation method in MongoDB the power of two sized memory blocks. This means that it allocates blocks in the following byte sizes (32, 64, 128, 256, 512 … up to 2MB).
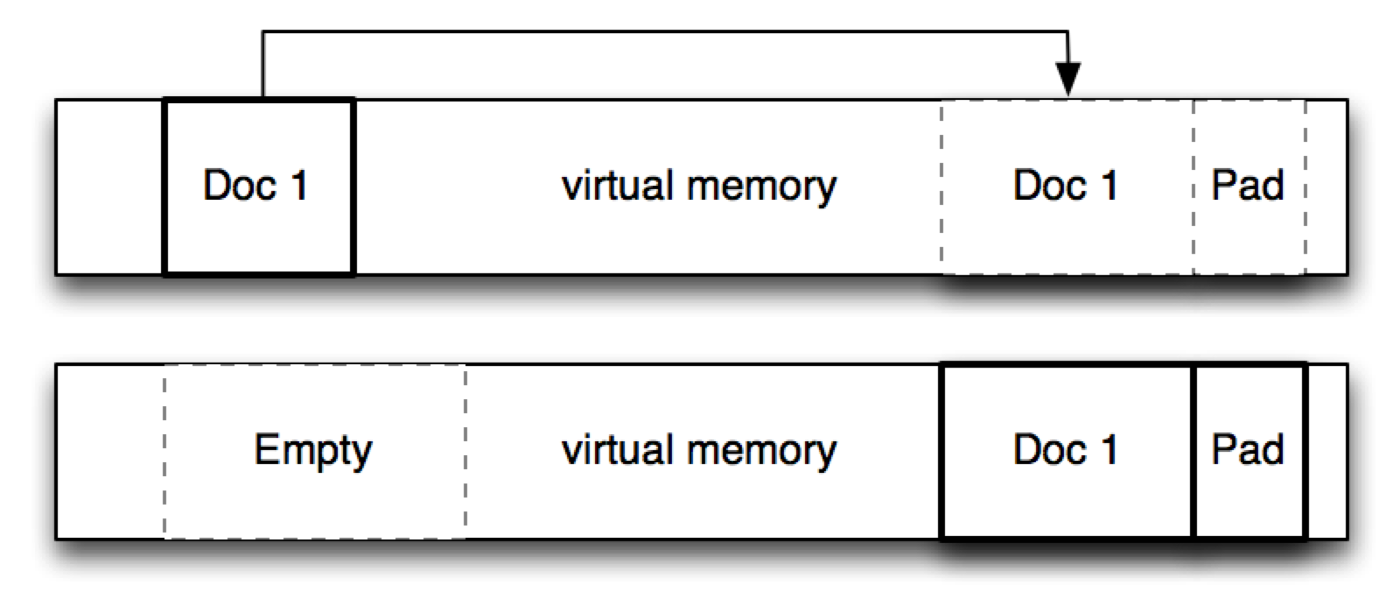
Before 2.6 MongoDB would allocate blocks of memory that were the size of the document as well as some additional free space at the end of it to allow the document to grow. This was called the padding factor. Unfortunately there were several pathological MongoDB usage scenarios that could cause inefficient reuse of these allocated blocks slowly increasing fragmentation. A typical one was a heavy insert/update/delete cycle with random sized documents.
An example is below.
Documents inserted with different sizes

    Doc 1: 24 bytes
    Doc 2: 12 bytes

Documents are growing constantly requiring new allocations

    Doc 1: 34 bytes, then 64 bytes, then 234 bytes
    Doc 2: 450 bytes, then 1034, then 233 bytes

Documents are then removed from the database

As new documents are inserted the server cannot reuse the non uniform memory allocations.

    Doc 3: 333 bytes requires new allocation
Over time this could cause memory allocations, which could not be reused by the server leading to memory fragmentation in the memory mapped files.
Fragmentation
When documents move around or are removed they leave holes. MongoDB tries to reuse these holes for new documents whenever possible, but over time it will slowly and steadily find itself having a lot of holes that cannot be reused because documents cannot fit into them. This effect is called fragmentation and is common in all systems that allocate memory including your operating system.

The effect of fragmentation is to waste space. Due to the fact that MongoDB uses memory mapped files, any fragmentation will be reflected as fragmentation in RAM. This has the effect of reducing the “Working Set” that fits in RAM and causes more swapping to disk degrading performance.
tip
How to determine the fragmentation
You can get a good indication of fragmentation by
  use mydb
  var s = db.my_collection.stats()
  var frag = s.storageSize / (s.size + s.totalIndexSize)
A frag value larger than 1 indicates some level of fragmentation
There are three main ways of avoiding or limiting fragmentation for your MongoDB data.
The first one is to use the compact command on MongoDB to rewrite the data thus remove the fragmentation.
Power of 2 Allocation
Power of 2 allocations is a trade off between the higher likelihood of being able to reuse allocated blocks of memory, against potentially underutilization of those blocks. Let’s look at two examples, one optimal for power of 2 allocation and one that causes a lot of underutilized blocks of memory.
The first scenario
User writes document of 510 bytes
Each document fit nicely in a 512 bytes allocation slot
Only 2 bytes per document is left unused in an allocation slot
The second scenario
User writes document of 513 bytes
The document only fits in the 1024 byte allocation
For each document 510 bytes are left unused in the allocation slot
As we can see, there are some drastic edge cases. However, this is outweighed by the fact that documents which outgrow their allocation can easily be moved to a either a new allocation or an existing empty one of bigger size.
The Power of 2 allocations feature also reduces the level of fragmentation possible,as there is a bigger chance of allocation reuse than the previous method used in MongoDB.
Exact fit (no padding) allocation strategy (MongoDB 3.0)
MongoDB 3.0 introduces the possibility of using an exact fit allocation strategy. This disables the power of 2 allocation strategy and is useful if your workload is inserts only, with no updates or removals of the document. This can be enabled by using the server collMod command with the noPadding flag set to true or when creating a new collection using the createCollection command in the shell with the noPadding option set to true.
Preallocation strategy
Preallocation is a strategy to minimize the amount of times a document moves. It aims to avoid the situation where a document is moved in memory as it grows in size. Let’s look at an example of the behavior we are trying to avoid.
Document 1 is written as a 123 byte document and put in a 128 byte allocation
Document 1 grows by 10 bytes and is copied to a 256 byte allocation
This can cause a lot of pointless work, requiring MongoDB to spend most of its time copying data causing the write and read performance to drop.
In many cases we might have documents that are in fact uniformly sized. Let’s take the example of a time series where we are counting the number of times a web page is viewed.
{
  , minute: {
    "0": 1
  }
}
When we register a measurement for a new second in the minute, the document gets another field added to the embedded document in the minute field.
{
  , minute: {
    "0": 1, "1": 1
  }
}
But since we know there are only 60 entries in the minute embedded document we can ensure that it does not grow by preallocating an empty document that has the maximum size the document will be. So we can insert a full size document for each minute.
{
  , minute: {
    "0": 0, "1": 0, "2": 0....., "59": 0
  }
}
This would avoid updates to the document growing it, This means all the updates would be in place ensuring the highest write performance the MMAP engine can provide.
Locking
MongoDB 2.6 introduced database level locking in 2.2 and improves on this in 3.0 with collection level locking. The lock references the write lock. When MongoDB only supported database level locking there could only be a single writer in a database. Let’s look at an example.
Driver Writes Document 1 to database test
Driver Writes Document 2 to database test
When a write happens under database level locking no other reads or writes can happen concurrently until the first write finishes. In the example above Document 2 has to wait until Document 1 has been completely written before it can begin. The constant write lock will starve any readers of the database.
A strategy to circumvent this is to ensure that write heavy operations go to different databases than read heavy operations. For example, there might be an application with the following scenario.
Analytics are written to the analytics database
User information and preferences are in the users database
This would ensure that operations against the users database would not be impacted by the heavy write operation against the analytics database.
important
MongoDB 3.0 introduced collection level locking reducing the contention in a database by moving the lock level down to the individual collection. If we have heavy write to collection1 this does not cause looks for reads/writes to collection2.